Back in September, we covered Part 1 of how to crash on your mountain bike 101. You can read that first crash analysis over here: MTB Crash Protection: Gear, Explained. We did a deep dive into the best gear to keep your body mostly intact. Since our species comes without an exoskeleton installed, we have to take it upon ourselves to protect your squishy insides.

Tip from Handles: Gear is important, but building your own internal body armor is more important (and mostly free — I know, I know… that isn’t good for selling stuff). You really shouldn’t have to be convinced about why strength training is good for you, but in case you are sitting on the fence of skepticism… I’m here to urge you to pick up some heavy weights and put them back down again. Strength training is a great way to build your internal protection (hello, muscles), and be less likely to prevent more serious injuries, like broken bones. I am not a doctor, so I must say that if you do indeed break yourself, whether under a bike or a barbell, I can’t be held liable — and neither can Jeff. I do, however, have 16 years of dedicated experience with training myself, and less than one broken bones… Now if you’ll excuse me, I have a lot of knocking on wood to do.
Q&A — Hey, Jeff! Why would I want to learn about bike things in the winter? I mean, c’mon… It’s January. There is snow in most parts of the Northern Hemisphere, and biking is months away.
A (from Handles first): What a great question! We are truly fortunate on the coast of the Pacific Northwest to be able to ride bikes all year-round. I mean, what I say “fortunate,” I mean that the FOMO never stops. Of all the possibilities in how you could spend your outdoor time, with your head already swiveling in a million directions… well, now you have skiing to do. It is, admittedly, a first world problem.
But back to your question. Visualization is a very real, very helpful tool (even backed by science) to improve your skills at something. Anything, really. Take some time to sit down, close your eyes, and visualize a technique you’re working on. It will improve your ability to perform that technique the next time you practice it in real life. The same is said when applying that visualization to the outcome of a performance. Imagine success, and that will add to the likelihood that you will claim victory as yours.
All of that being said, watching videos is also a useful tool to enhance your visualization. It can be challenging to tap into visuals in your mind if it’s been a while since you’ve done something, or if you haven’t done a specific thing before. Watching a video of a skill that you are aspiring to achieve is like whetting your appetite. So, no bikes in the winter? No problem. Watch some videos, imagine yourself in the bike seat, and you’ll have more of a foundation that carries over the hiatus between autumn and spring.
Fortunately, I have an entire library for your perusal, so you can invite your date over to JKW and chill.
All of this applies to crashing. Not that you want to visualize crashing and breaking yourself open (been there, done that). But you can watch how a crash unfolds, so that you know what to expect, and then visualize how your body will best propel itself out of the (hopefully somewhat controlled) chaos.
I might even suggest that watching some (low key) crashes can be helpful. If you don’t have much experience crashing, watching someone else successfully come out of it will build confidence that you can do the same.
I (Handles) remember the first months that I was getting into mountain biking. I had never ridden a bike that needed weaving between trees and navigated over rocks. What happens when you land between a rock and a bike? How do you avoid being a splattered tomato? What technique can you utilize to avoid permanent disability?
I quickly learned that crashes usually happen so fast that your brain doesn’t have time to come up with a plan. One second, you’re smoothly coming over a teeter-totter feature; and less than one second later, you’ve found yourself in a body that now resembles a pretzel on the very hard, unforgiving ground.
That was my most devastating crash, and fortunately others since have been less brutal. My favorite was going down a very steep, loamy chute; somehow I lost control, but magically jumped over the handlebars like a ballerina.
I’m not sure how much magic it was versus technique; I have a feeling that a lot of it might be to do with the body’s natural instinct to avoid becoming completely mangled. But — practice, visualization, and familiarizing yourself with technique seen in videos is sure to help you come out on the other side in one piece.
Without further ado, let’s get past Savannah’s beginner’s perspective, and into Jeff’s very seasoned experiences.
TLDR; Any purchases you make from this post through JensonUSA send a small percentage my way, and help support me in making the videos and content you love! Thanks for your support! And, if you love the written tutorial, you can sign up for monthly video tutorials over here on my Patreon. See ya there! 🚴
Editor’s Note:
These articles are adapted by Savannah from Jeff Kendall-Weed’s YouTube videos for riders who prefer reading over watching. They’re written in Jeff’s first-person voice to stay true to the style and storytelling of the original content.
This article comes from July’s Patreon video about “How to Crash Safely.” For less than the price of a fancy coffee, you can join myself and a community of growth-minded mountain bikers, where I share a monthly tutorial about how to ride bikes better. I’d love to have you there!

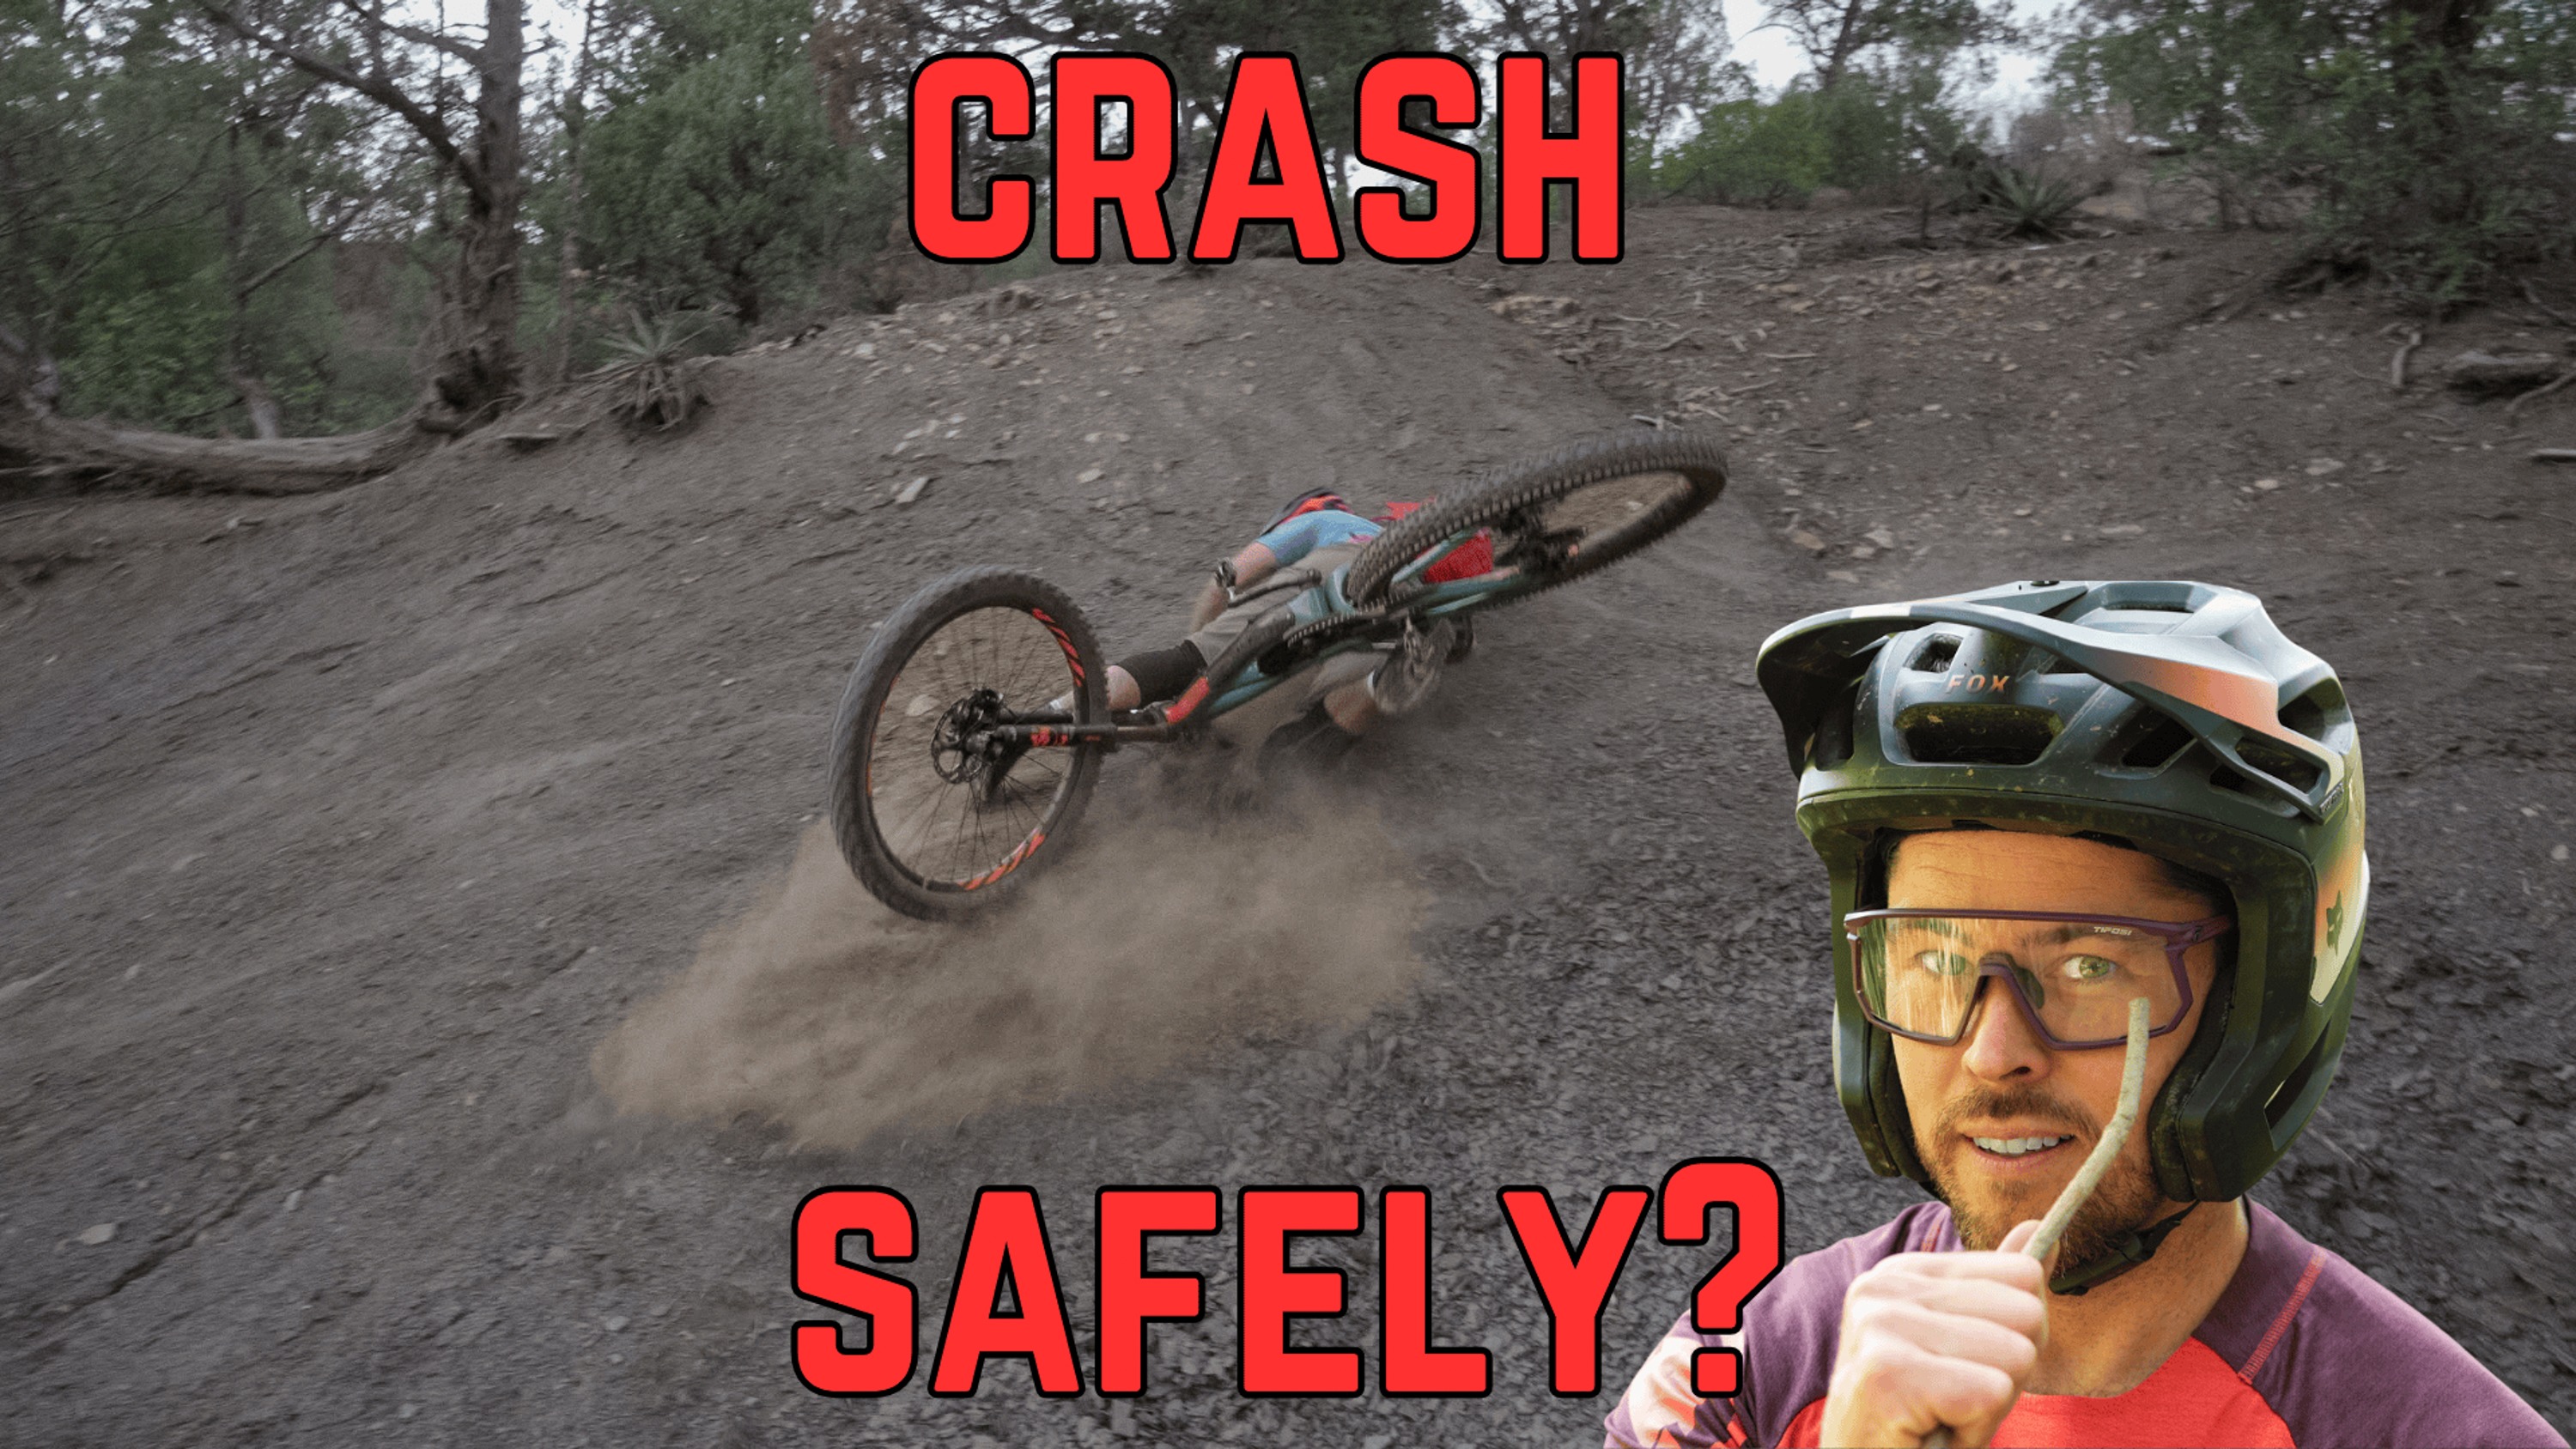
Every mountain biker crashes. The question isn’t if — it’s how. And while your gear can soften the blow, it’s your crash technique that decides whether you’re limping back to the trailhead or laughing it off with a story. Today, we’re going to dive into the finer art of falling: the mindset, body mechanics, and tricks that help you roll, slide, or run it out when gravity pulls the rug from under your tires.
CRASH TECHNIQUE
Whether or not you actually are going to crash often comes down to mindset. As with most situations in life, choosing acceptance over denial will take you far. So, yes – when the impending crash becomes inevitable, accepting that we are crashing is part of the process.
But, in the split seconds before that, there’s time for a mental check:
Can we inject ourselves with a dosage of confidence, and pull off this feature?
Do we really have to crash, or can we rally a little extra skill to ride it out?
It goes without saying: if you can avoid a wipe out, it’s always better. Too often, we tell ourselves that we’re headed downhill via a stop at a tree, and write our very own self-fulfilling prophecy.
There’s a saying in the world of dirt bikes: “when in doubt, gas it out.”
The same mindset helps when tumbling on a mountain bike. When you let go of the brakes, you can often grab a save.
On the other side of the strategy, with enough experience, you can strategize an intentional crash, in order to avoid a worse crash.
All of that being said, crash technique starts in your mind (the first thing we want to protect with our gear!).
Mindset is often a big piece of the pie – whether in mountain biking, dirt biking, or life. Visualize that you’re going to crash? You probably will. Visualize that you’re going to make it? You probably will. When you engage all five senses while visualizing success, you can trick your mind into believing that you have already achieved what you are aiming for. Some may argue that it’s a little tricky to activate a 5-senses-visualization when flying through the air – and you’re not wrong – which is why it’s important to do some visualization practices off the bike.
If you’re a visual learner, try watching videos like this and imagine yourself nailing the save. It’s a great way to activate the mind and visualize success.
CORNERING
Now, let’s take a few pedals back to the physical world and dive into cornering.

Having a plan for a botched corner is a major boost for your general riding confidence, because, well, corners are a common place for crashes to unfold (er, unroll?). The worst kind of corner crash is one that sends you over a berm, and then catapults you over the bar. That’s one of a handful of reasons why I love a high-low line choice, as it prevents such a chain of events to transpire.
If you’re coming into a turn faster than you think you’ll be able to handle, add a significant lean to your bike. You’ll likely be able to scrub a bit of speed with your rear brake; but if that’s not going to work, plan on jamming the inside of the bike down into the ground. When you intentionally do that, you’ll dab your inside foot as well. If done properly, you’ll be able to do all of this without touching the ground beyond that dab with your foot.
Remember to weight the rear of the bike, allow some oversteer if needed – and all should be okay! Understeer, and you could hit the immobile objects on the outside of the turn.

TARGET FIXATION
Here lies one common problem in biking. And, really, in being human. Fixating on a target without any peripherals taking in information can be a big bummer in any part of your life.
But, with biking – our greatest danger is a sudden de-acceleration, the worst of which is into a fixed object. Trees, rocks, the ground (thank you, gravity). Removing target fixation from your riding habits starts with awareness. Yes, you need to notice the objects around you, but at the same time, you want to focus on not hitting them – which means NOT staring directly at them. Aim to be adjacent to them, but not becoming one with them in a human-object sandwich.
This is especially prevalent as you become more fatigued on a longer ride, and your focal point begins to drift downward. You’ve probably been there before: staring straight at the rock in the middle of the trail, and boom – into the rock you go. Keeping your focus ahead is great to avoid this, and one way to dial this in is with winter riding in the cooler months.
With the trial lit up with night lights, your gaze is forced to follow the illumination. It’s a great skill that translates over into sunny night-light-free months.

JUMPING
It goes without saying: when your tires leave the ground, your likelihood of crashing increases alongside the inches of air between you and the earth.
You see dirt jumpers frequently do one of two things:
- toss their bikes and slide down the landing, or
- land and run out of it (remember the running-friendly shoes we talked about?)
This only really works if the jumps are especially steep and tall. The running out technique is a bit of a gamble – you can’t really run faster than 20 mph, and many jumps propel you at a speed faster than that. Still, depending on the size and character of the jump, that might be better than nosing into the back of a landing and splattering like a bowl of spaghetti.
Blow a knee out? Unfortunate, but it can be fixed. Smash your head into the ground? You may be stuck with a life-altering brain injury.
Another jump crash is transforming into a dead sailor, and getting sent OTB mid-air. In that case, it’s better to throw the bike than to hit the ground headfirst. (Remember: mindset is everything, and difficult to set when you’ve smashed your mind in).
Back to our trail running shoes! Yes, trail running is great to stay in MTB-shape, and I’m sure it can only help run out of a crash, but we’re still talking about mountain biking (and to be fully transparent, I don’t trail run in my mountain biking shoes. I’ve got my Merrell Trail Gloves for that!).
Rather than hit a little tree after running out of brakes and cornering talent, I chose to run away from my problems rather than confront them head-on. Har-har. (This statement is probably funnier in the context of the video).
Shoes you can’t run in will trip you – and you don’t want to go splat!

ROOT + ROCK GARDENS
One of the hardest types of crashes to prepare for is the root or rock garden slip-out. This is because you lose control immediately, and the ground is jagged. Options are limited. The world, as you know it, is coming to a painful end. It’s in your best interest to minimize damage, but look at all those rocks!
Again, avoid the immobile objects – you know, the ones that are surrounding you. Stay present; if you can save yourself, do it, but don’t expect one outstretched arm to be enough, that’s how shoulders get torn.
This sudden – and incredibly pokey – tumble can be made safest by sliding, or tucking and rolling. But, when the surface is jagged, neither option is a good call. When presented with no other obvious solution, I usually do my best to let my body relax and simply allow the crash to happen. If you don’t fight it, you won’t be tearing up good ligaments and muscles.

ADD A LITTLE GYMNASTIC FLAIR
When I was in 7th grade, I was a wee wrestler and learned another great technique: the backwards somersault. Who knew that gymnastics would come in handy for mountain biking? If you haven’t done a somersault since you were a kid, you might want to find a grassy field to get rolly-polly in, because practice definitely helps to make this move feel less terrifying – and be more likely to prevent damage.

Like somersaulting, the tuck-and-roll can be helpful, though not always viable. If that isn’t going to go well, you can opt in for a slide. Moments like this are when that investment in armor pays its dividends.
And in the end? If you can pick where you body is going to hit the ground, the goal is always something soft that will help dissipate your impact. Aim for steep sections of a hillside or bushes. I’d rather fall down a steep hillside to slow impact (instead of a flat stop)… as long as it’s not a cliff.
The best crash is the one that doesn’t happen — but since that’s never guaranteed, knowing how to fall can turn fear into confidence.
Gear up, practice the mental game, and add a little gymnastic flair when the ground racing toward you.
Because when you accept that crashing is part of riding, it stops being something to dread — and starts being just another skill in your mountain biking toolkit.
If you enjoyed these tips, come on over to Patreon for a monthly tutorial… plus dozens upon dozens in the archives!

Peace & Wheelies,
🚴 — Jeff
As always, huge thanks for the support — your purchases and engagement truly keep the channel rolling, and I appreciate every bit of it.
Your comments spark connections, fuel ideas, and help me share more rad stories, tips, and tutorials. Hungry for more? Hit subscribe on the blog, YouTube Channel, and drop a like or comment whenever the urge strikes!
Special shoutout to Endura for hooking me up with killer riding kits and protective gear — dive into their lineup here.
And big thanks to LMNT for keeping me properly hydrated with those electrolyte packs — grab a free sample pack with your order here.